
Just in time for the good weather, I’ve finally completed the garden renovation. Well, I say the garden renovation, mainly the patio area. I’ve still got around a quarter of the garden to finish – but that’s a job to do this month.
The time scale was fairly extended for the garden. It’s been a work in progress since the spring, so I would say it’s taken around 4-ish months to get to this point. From laying the concrete foundations to grouting the patio took about 2 months. Only because we worked on it 1-2 days a week.
Gardens can surprisingly take a long time to complete. There’s plenty of planning on where things should go, ordering the materials etc. Luckily my garden isn’t huge, so there wasn’t a huge amount to do.
Before
I wanted to breathe a bit of love into the garden as it had been seriously neglected. The current patio was tiny and the foundations had started to break apart. The slabs were loose and there wasn’t much to salvage.


The garden is designed as a bit of a thoroughfare. As I don’t have a drive at the front, I park and charge my car at the back. So the footpath through the garden is used frequently. The concrete path is original to the 1970s and in not too much of a bad condition so I decided to leave that.
I knew the grass in the middle of the garden was fairly large. I didn’t want to keep too much of it, but just a little slither. As it was a fairly standard rectangle design with a footpath down the side and borders on each side, it was easy to shake things up a bit.
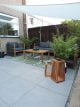
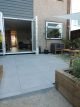
After
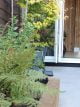
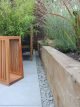
First things first, the raised border purposely separates the patio area and grass. I wanted to shield the patio a little and hide the rest of the garden. By using a raised border I was able to plant tall ornamental grasses and an Acer tree. This makes it easily visible from the lounge window.
For the borders, I used standard wooden sleepers. To make them last longer, I painted special black waterproof paint on the inside. I then lined the inside with black plastic sheeting. This will help make it last longer by stopping moisture penetration.

Filling it with soil was the next chore. I didn’t want to spend hundreds of pounds just to fill it with soil. I found someone on Facebook Marketplace getting rid of soil for free. So I took some used compost bags and collected the soil for free. I mixed this in with fresh compost and new soil.
Now the middle raised border was complete, it was time to focus attention on the patio. But first, all the concrete slabs had to be ripped up to prepare the area for foundations.
The concrete slabs weren’t in too much of a bad condition, so I put these on Facebook Marketplace (the only reason I ever go to Facebook). I had two people interested in them and I had all of the slabs collected – for free. This is what I like!

For a stable base, we made a thin concrete layer over gravel. This had to be done in sections as at the time we didn’t have a concrete mixer. We managed to borrow one for the paving slabs, thank goodness. So if you’re making a concrete foundation for your patio, rent a cement mixer. It will speed the whole process up.
Once the base was complete, it was time for the paving slabs. I chose the beautiful Malden Grey Porcelain Paving from Stonesuperstore. My main concern was longevity as I wanted these to last a very long time. Porcelain is a very strong material which will last a long time and resists stains and damage pretty well.
The paving slabs have a matt effect to them and a slightly rough texture. It looks very much like poured concrete, which you could get that effect all over if using the same colour grout. I’m seriously impressed and I love them. It has changed the space and made the area look massive.


Now the patio is much larger, it has given me plenty of space for an outdoor sofa set which I had always dreamed of. After making my shortlist of outdoor furniture, I had my heart set on the Rimini Sofa Set from Very. I originally didn’t want wood, but if I protect and take care of this, it should last a long time.
This sofa set was on offer at the time and it was an absolute bargain. It looks much more expensive than it does with its modern sleek style. The grey rope gives it that beach club look vibes. It arrived extremely quickly and I’m impressed with the quality. I wouldn’t hesitate in buying furniture from Very again.

The one thing that pulls the whole outdoor sofa area together is the amazing leaf print rug from Homebase. Surrounding the sofas I’ve dotted plenty of anthracite grey pots from Elho. The colour matches the plastic slating above my patio doors, so I wanted to dot that colour around the outdoor space. These pots have water reservoirs in them to help keep your plants from drying out.
I’m planning on wiring in some mains-powered spotlights around the garden. In the meantime, I got some solar spotlights on a wire from Homebase that look amazing. There are also some nice solar wooden floor lights from Clas Ohlson – they’re closing their last UK shop, it’s so sad, so I just had to buy both sizes!
The total cost of renovating the patio including the wooden sleepers was around £1,500 excluding labour. This price was based on summer 2022 pricing as I purchased items over a few months. This does not include furniture pricing.
Products
Patio area
- Patio slabs: Malden Grey Porcelain Paving, £29.90 per m2, Stone Superstore
- Grouting: EASYGrout in Dark Grey, £34.40, Amazon
Garden
- Wooden sleepers: Pressure Treated Softwood Sleepers, £23, Chesham Fencing
- Black waterproofing paint: Bostik Waterproofing Paint, £24.99, Screwfix
- Masonry paint: Smooth Masonry Paint, £23, Homebase
- Fence paint: Ronseal Dark Oak, £8.99, Screwfix
- Plants: The majority were purchased from Dobbies.com
Furniture
- Sofa set: Rimini Sofa Set, £799.99, Very
- Outdoor rug: Green Leaf Outdoor Rug, £30, Homebase
- Plant pots: Loft Urban and Greenville collections, Elho
- Solar spotlights: 10 Solar Ground Spike Lights, £8.47, Homebase
- Wooden solar floor lights: Wooden Solar Lights, Clas Ohlson
- Shade sail: Sekey Sun Shade Sail, £17.39, Amazon


