
It’s finally here, the first of many room-by-room renovation posts. This is the first room that is 100% complete (minus the door and handle, but that will happen soon).
Renovating a bathroom I thought would be fairly easy, but it turns out it can be fairly annoying. Pipework getting in the way, making things perfectly even oh and grouting – don’t get me started on grouting (my dad removed the grouting I did and re-grouted it, no joke 😅). However, it can all be done with plenty of patience.
The bathroom renovation took around a month from start to finish, with us working on it 3-4 days a week. I wanted to get this complete before moving in, so it was a priority last year and one room that became usable before the rest of the house.
I didn’t want to spend a huge amount of money on it, but I did splurge on a few luxuries but saved on things that I didn’t see the point in spending huge money on. Read on to discover my bathroom renovation in my 1970s house…
If you haven’t seen it yet, start with My Bathroom Renovation – The Plan
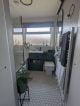
Before
This was one room in the house I was looking forward to completely renovating. It was looking tired and lacked a modern look. I think the layout hasn’t changed since the 70s, so anything I could do to improve this was a bonus.
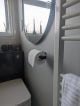
The one thing this bathroom lacked was storage. The mirror cabinet that sticks out of the wall was annoying right beside the toilet. Also, the windowsill was angled, preventing anything from being placed on it. Bathrooms can easily become overloaded with things, so finding places to store things was essential.
After checking where the pipework was and not wanting to create any large plumbing jobs, the plan was to keep the layout the same. The only thing that needed to be changed was the location of the door by moving it into the landing, making it flush with the wall above the stairs. Anything to make this room feel a bit larger!


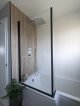
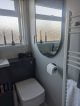
After
Firstly, it was just my dad and I doing the work (well maybe my dad most of it, I can’t take full credit). This meant I kept the design very simple and didn’t change the layout at all. By not undertaking any huge plumbing work, this saved a considerable amount of money.
Now came the fun bit, demolishing the entire thing. If anyone thinks taking tiles off a floor is easy, they are wrong. Removing the floor tiles was tough because of the horrible adhesive underneath (which was eventually chipped off bit by bit). Then the tiles next to the bath pulled the plasterboard off with it. We realised that it was standard plasterboard, so water had rotted it away. This was replaced with a plasterboard designed for bathrooms and resists moisture.
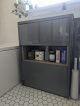
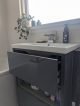
For the toilet and sink unit, I wanted something modern and minimalist. I chose the Haywood Grey Modern Sink and Toilet from Victorian Plumbing. I love the look of it and the exposed wood-effect shelf between the drawers. The only downside to the design is that the drawers aren’t that deep. This means bottles like mouthwash can’t stand up. So keep this in mind when choosing a drawer unit and get measurements of all of it.


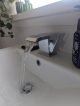
My dream was to have a black tap and shower, but as I’ll eventually rent this out in the future, I wanted something long-lasting and will last a long time so opted for stainless steel. To continue with the modern look, I found the Glacier Waterfall Mono Basin Mixer Tap tap which looks pretty unique. We’ve all seen those hilarious videos of the usual waterfall tap shooting water across the bathroom, with this one, water is angled down. It also means any limescale that may build up, won’t be on display from above.
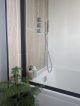
I went for the Arezzo L-Shaped Shower Bath and I’m very pleased with the size. It fits perfectly in the space and as I use the shower every day, it’s an ideal size. I splurged a little on the shower and went for the Zane Concealed Shower with a huge 30cm showerhead. This was part of a set including an overflow bath filler (instead of a bath tap) and hand-held spray. I’m so impressed with it and can highly recommend it.
As I had splurged on other parts of the bathroom, I decided to cut the costs on the tiles and opted for a simple plain matt white from Topps Tiles. On the shower wall, I choose the beautiful Stanton Wood Oak Matt tiles from Tile Giant. These look so good and I’m extremely impressed with them. They have a rough texture to them which make them ideal for use on either the floor or wall. I’ve got some leftover and I think I’ll use these in the downstairs toilet.
Moving onto the floor, I went for matt white hexagon mosaic tiles with an anthracite grey grout – something I have wanted for a long long time. One major thing to have in mind, if you’re planning to have mosaic tiles like this, you must have a FLAT floor. My dad wasn’t impressed with me choosing these tiles, so we needed to use a self-levelling compound. It worked but it was pretty fiddly and well worth it.

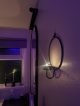
On the remaining walls, I opted for the Grey Fox bathroom paint from Homebase which added a bit of softness to the room instead of it being completely white. As I chose to avoid black taps, I opted for black accents dotted around the bathroom. You’ll see a black beading edge on the shower wall, shower screen, lighting and mirror. Once I’ve got new doors, this will also feature a black knarled handle which will then tie it all together.
Lighting in the bathroom is something that’s often overlooked. I decided to go for two lights from IKEA which can be controlled independently from the switch outside. One main overhead light in a nice matt black and a matching one over the mirror. I’ve realised I use the light over the mirror pretty much all the time as it gives off a very pleasant light. Perfect if you’re at the mirror or relaxing in the bath.
Overall, I’m very happy with the bathroom and everything we’ve achieved to fit as much inside as possible. It’s a small space, but with plenty of space for storage, I think this works flawlessly.

The total cost of this bathroom renovation was around £1,900 excluding labour. This price was based on May 2021 pricing and may have since changed. It also includes other small necessary items such as pipework, skirting boards etc.
Products
Bathroom units
- Bath and Shower Screen: Arezzo Shower Bath, £429.95, Victorian Plumbing
- Sink, Vanity and Toilet: Haywood Grey Modern Sink and Toilet, £499.95, Victorian Plumbing
Tiles
- Floor: Hexagon Matt White Mosaic Tile, £4.99 per tile, Tiles-Direct
- Shower head wall: Stanton Wood Oak Matt, £4.52 per tile, Tile Giant
- Walls: Simply Matt Tile, £1.49 per tile, Topps Tiles
- Walls: Grey Fox Bathroom Paint, £18, Homebase
Taps
- Sink tap: Glacier Waterfall Mono Basin Mixer Tap, £69.95, Victorian Plumbing
- Shower/Bath: Zane Concealed Shower, £249.99, Drench
Final touches
- Mirror: Lindbyn Mirror, £45, IKEA
- Toilet roll holder: Skogsviken, £2, IKEA
- Ceiling light: Raksta, £27, IKEA
- Wall light: Raksta, £19, IKEA
- Window blind: Unilux PVC Blackout, from £12.76, Swift Direct Blinds
